---
sidebar_position: 0
title: Myop CLI
description: The Myop CLI lets you create, develop, deploy, and manage Myop components from the command line. Works with React, Vue, Angular, and React Native. Includes AI agent skills for 30+ coding assistants and MCP server integration.
keywords: [myop cli, myop commands, npx myop, myop component, myop deploy, myop create, myop dev, myop push, myop pull, myop train, myop mcp, ai component development]
slug: /cli
---
# Myop CLI

The Myop CLI is a command-line tool for creating, developing, and deploying **Myop components** — isolated, independently deployable UI modules that integrate into any host application.

```bash
npm install -g myop
# or use directly
npx myop create
```

---

## Workflow

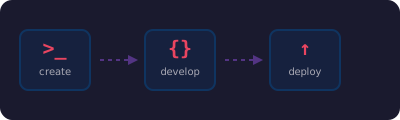
Build a component in three steps — create, develop, deploy:

<div style={{textAlign: 'center', margin: '24px 0'}}>
  <img src="/img/cli/workflow-create.svg" alt="Myop CLI workflow: create, develop, deploy" width="400" />
</div>

| Step | Command | What happens |
|------|---------|-------------|
| **Create** | `npx myop create` | Scaffolds `index.html` + `myop.config.json`, installs AI skills, starts dev server |
| **Develop** | `npx myop dev` | Local dev server on port 9292 with hot reload |
| **Deploy** | `npx myop push` | Uploads to Myop platform — live instantly, no redeploy needed |

---

## Component Public API

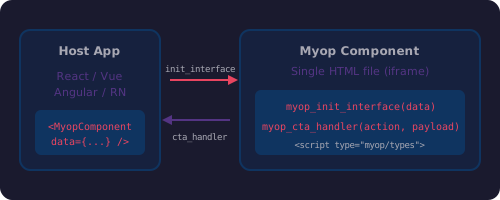
Every Myop component communicates through exactly **2 global functions**:

<div style={{textAlign: 'center', margin: '24px 0'}}>
  <img src="/img/cli/component-api.svg" alt="Myop component public API — myop_init_interface and myop_cta_handler" width="500" />
</div>

| Function | Direction | Purpose |
|----------|-----------|---------|
| `myop_init_interface(data)` | Host → Component | Receive data, render UI |
| `myop_cta_handler(action, payload)` | Component → Host | Send user actions back |

Types are defined in a `<script type="myop/types">` block with TypeScript interfaces — used by auto-generated packages and AI coding assistants.
[Learn more about component development →](/docs/cli/create-component)

---

## Dev Server

Start a local development server with file watching and instant HMR:

<div style={{textAlign: 'center', margin: '24px 0'}}>
  <img src="/img/cli/dev-server.svg" alt="Myop dev server with hot reload on port 9292" width="440" />
</div>

```bash
npx myop dev        # Single component
npx myop dev -m     # Monorepo mode — multiple components
```

- **Port 9292** — Component preview with hot reload
- **Port 9293** — Management dashboard
- **Monorepo mode** — Serve multiple components simultaneously

<img src={require('../6_cli/img/dashboard-full.png').default} alt="Myop DevTools Dashboard" style={{maxWidth: '100%', display: 'block', margin: '20px auto', borderRadius: '8px', boxShadow: '0 4px 12px rgba(0,0,0,0.3)'}} />

[Learn more about the dev server →](/docs/cli/dev-server)

---

## Host Integration

Embed Myop components in any framework with the official SDKs:

<div style={{textAlign: 'center', margin: '24px 0'}}>
  <img src="/img/cli/host-frameworks.svg" alt="Myop host SDKs for React, Vue, Angular, and React Native" width="500" />
</div>

```tsx
import { MyopComponent } from "@myop/react";

<MyopComponent
    componentId="your-component-id"
    data={{ title: "Hello", items: ["a", "b"] }}
    onItemSelected={({ itemId }) => console.log(itemId)}
/>
```

All SDKs support typed event handlers, data binding, preloading, auto-sizing, custom loaders/fallbacks, and `enableLocalDev()` for local development.

[Learn more about host integration →](/docs/cli/host-integration)

---

## Push & Pull

Deploy components and download them from the Myop platform:

```bash
npx myop push                  # Deploy to Myop
npx myop pull <componentId>    # Download component
npx myop list                  # Browse, search, batch pull/push
```

- **First push** assigns a `componentId` (UUID) and saves it to `myop.config.json`
- **Subsequent pushes** add new versions — live instantly
- **`myop list`** provides interactive search with multi-select for batch operations

[Learn more about push & pull →](/docs/cli/push-and-pull)

---

## AI Integration

Teach AI coding assistants how to build Myop components and give them platform access:

<div style={{textAlign: 'center', margin: '24px 0'}}>
  <img src="/img/cli/ai-skills.svg" alt="myop train installs skills for 30+ AI coding assistants" width="460" />
</div>

```bash
npx myop train    # Install AI agent skills (30+ assistants)
npx myop mcp      # Configure MCP server (Claude Code, Cursor, Windsurf, Copilot)
```

**`myop train`** installs SKILL.md files using the [Agent Skills standard](https://www.npmjs.com/package/skills) — works with Claude Code, Cursor, Windsurf, VS Code Copilot, Kiro, Goose, Augment, Cline, and 30+ more.

**`myop mcp`** configures the Myop MCP server so your AI assistant can upload, list, and read components directly.

[Learn more about AI integration →](/docs/cli/ai-integration)

---

## All Commands

| Command | Description |
|---------|-------------|
| [`myop create`](/docs/cli/commands#myop-create) | Create a new component |
| [`myop dev`](/docs/cli/commands#myop-dev) | Start dev server with HMR |
| [`myop push`](/docs/cli/commands#myop-push) | Deploy component to Myop |
| [`myop pull`](/docs/cli/commands#myop-pull) | Download component from Myop |
| [`myop list`](/docs/cli/commands#myop-list) | Browse and batch operations |
| [`myop train`](/docs/cli/commands#myop-train) | Install AI agent skills |
| [`myop mcp`](/docs/cli/commands#myop-mcp) | Configure MCP server |
| [`myop login`](/docs/cli/commands#myop-login) | Authenticate with Myop |
| [`myop logout`](/docs/cli/commands#myop-logout) | Clear credentials |
| [`myop whoami`](/docs/cli/commands#myop-whoami) | Show current user |

[Full commands reference →](/docs/cli/commands)