Experience Builder
What Is the Experience Builder?
The Experience Builder is Myop's interface for creating and managing personalized user experiences. An experience lets you define which component variants are shown to different user segments — based on rules like country, device type, or user group — all without writing code.
With the Experience Builder, you can target specific audiences, run A/B tests within segments, and set fallback variants for users who don't match any segment.

Key Features
- Component Selection — Choose which components to include in your experience.
- Segment Configuration — Define user segments with rule-based targeting (e.g., country, device type, user group).
- A/B Testing — Split traffic within a segment to test different variants with percentage-based distribution.
- Variant Assignment �— Select which component variant each segment sees.
- Fallback Variants — Define default variants for users who don't match any segment.
- Sticky Hashing — Ensure consistent user bucketing across sessions using hash properties.
- Tags & Organization — Categorize experiences with tags for easy discovery.
- Save & Publish — Save your configuration and publish it as an immutable release.
- Unsaved Changes Protection — Prevents accidental navigation away from unsaved work.
Interface Overview
The Experience Builder is divided into three main areas: a top bar, a left panel, and the main configuration area.
Top Bar
The top bar contains experience and variant management:
Experience Section (Left)
- Experience Name — Inline editable name field. Changes are auto-saved.
- Experience Selector — Dropdown to switch between existing experiences (with search).
- Menu — Add or manage experiences.
Variant Section (Center)
- Variant Name — Inline editable name for the current variant.
- Variant Selector — Dropdown to switch between variants (with search). Shows a "Published" badge on published variants.
- Add Variant — Create a new variant or duplicate an existing one.
Action Buttons (Right)
- Save — Save the current configuration. Enabled only when there are unsaved changes and validations pass.
- Publish — Publish the current variant as an immutable release. Enabled only when the experience is saved and all required configuration is complete.

Left Panel
The left panel can be collapsed and expanded using the toggle button. It contains:
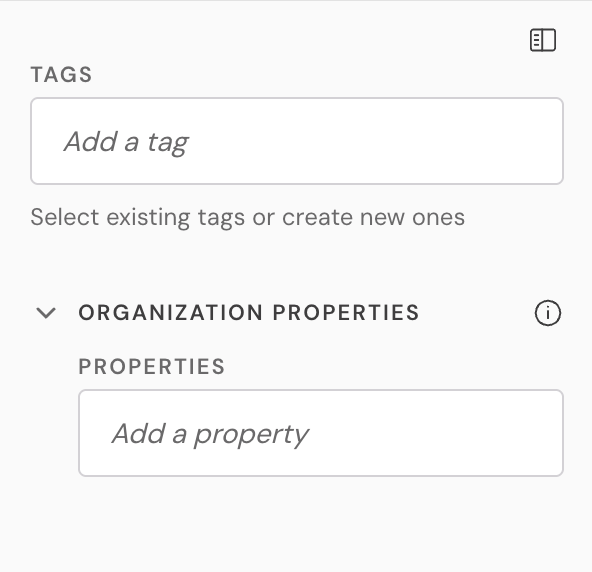
Tags
- Add tags by typing and pressing Enter or comma.
- Tags appear as pills that can be removed.
- Tags are auto-saved separately from the main configuration.
- Tags are shared across your organization for consistent categorization.
Organization Properties
- Developer-defined values used for segmentation and sticky hashing.
- Properties added here become available as options in segment rules.
- Properties that are actively used in segments are marked as blocked and cannot be removed.
Main Configuration Area
The main area contains three configuration cards that guide you through the setup process:
1. Component Selection
- Multi-select dropdown with search to choose which components to include in the experience.
- Selected components appear as pills that can be removed.
- Once components are selected, segment configuration becomes available.
2. Segment Configuration
- Shows a list of configured segments, each with its name, description, rules summary, and A/B testing indicator.
- Add Segment button to create new segments.
- Each segment can be edited or deleted.
- Empty state is shown when no segments are configured.
3. Variants Selection
- Tabbed interface showing each selected component.
- For each segment, select which variant of each component to display.
- For A/B testing segments, select a variant per split group (e.g., Group A, Group B).
- Fallback section at the bottom to define default variants for users not matching any segment.

Getting Started
Step 1: Open the Experience Builder
Navigate to the Myop Dashboard and click Add Experience or select an existing experience. The Experience Builder opens with the configuration interface.
Step 2: Name Your Experience
Click on the experience name field in the top bar and type a name (e.g., "Summer Campaign").
Step 3: Select Components
- In the Component Selection card, click the dropdown.
- Search for and select the components you want to include (e.g., "Hero Banner", "Product Grid").
- Selected components appear as pills. Click x to remove a component.
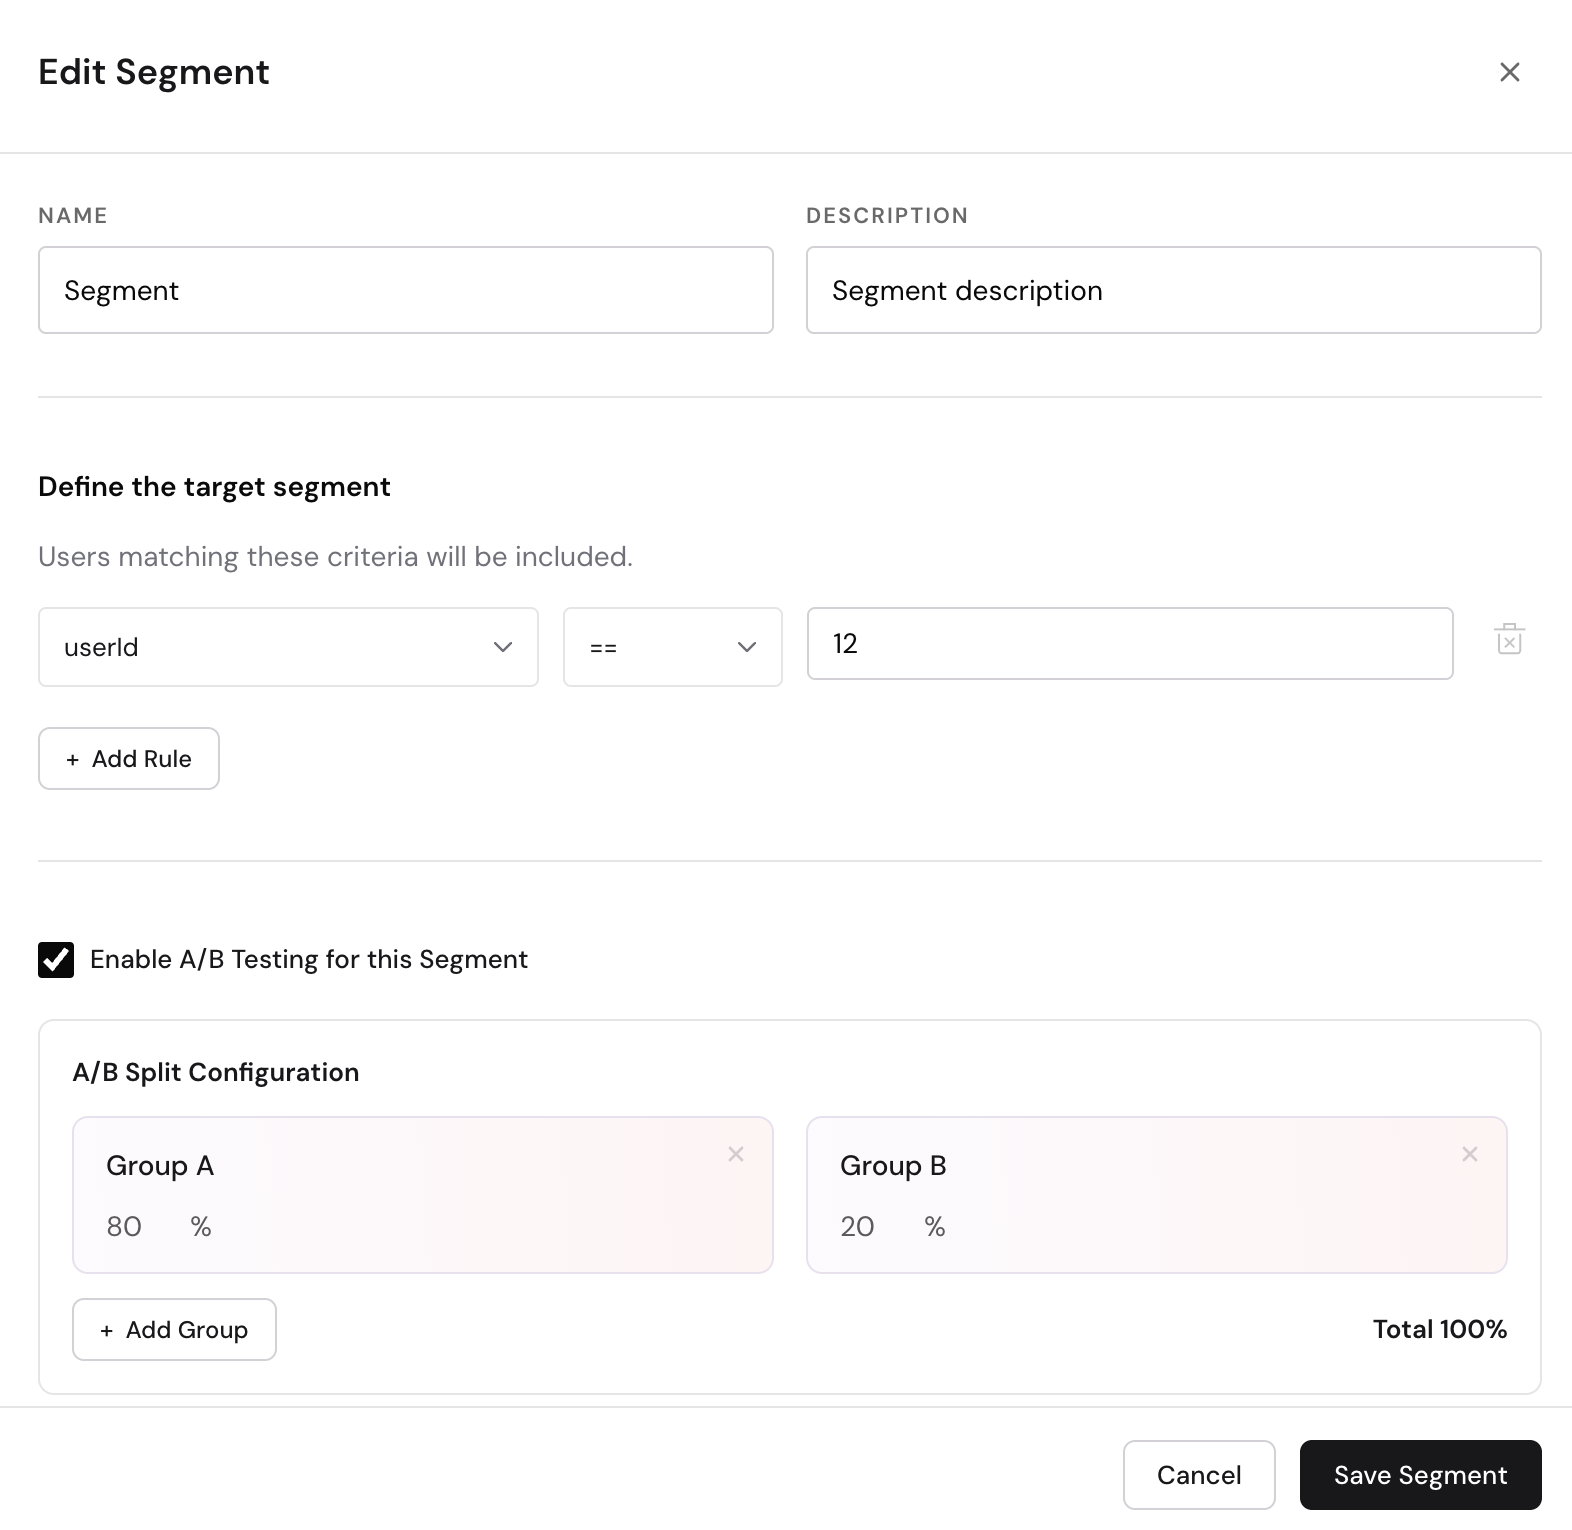
Step 4: Configure Segments
- Click Add Segment in the Segment Configuration card.
- In the segment modal, fill in:
- Segment Name (required) — e.g., "US Users".
- Description (optional) — e.g., "Users browsing from the United States".
- Rules — Define targeting conditions:
- Select a property (e.g., countryCode).
- Select an operator (e.g.,
==,!=,in,not in,>,<). - Enter a value (e.g., "US").
- Click Add Rule for additional conditions.
- Optionally, enable A/B Testing:
- Check "Enable A/B Testing for this Segment".
- Configure split groups with percentage distribution (must total 100%).
- Add more groups as needed.
- Optionally, select Sticky Hashing Properties for consistent user bucketing across sessions.
- Click Save Segment to add the segment.
Step 5: Assign Variants
- In the Variants Selection card, use the component tabs to switch between components.
- For each segment, select a variant from the dropdown.
- For A/B testing segments, select a variant for each split group.
- In the Fallback section, select a default variant for each component for users who don't match any segment.

Step 6: Save Your Experience
Click the Save button in the top bar. The save button is enabled only when there are unsaved changes and all required fields are valid.
Step 7: Publish
Once your experience is fully configured and saved, click Publish to create an immutable release. Published variants cannot be edited — to make changes, create a new variant.
Segment Rules
Segment rules define which users belong to a segment. Each rule consists of:
| Field | Description |
|---|---|
| Property | A user attribute (e.g., countryCode, deviceType, userGroup) |
| Operator | A comparison operator (==, !=, >, >=, <, <=, in, not in) |
| Value | The value to compare against |
Multiple rules within a segment are combined — a user must match all rules to be included in the segment.
A/B Testing
A/B testing lets you split traffic within a segment to compare different variants.
- Enable A/B testing when creating or editing a segment.
- Define split groups (e.g., Group A: 50%, Group B: 50%).
- Assign a different variant to each group.
- Percentages must total 100%.
Use Sticky Hashing Properties to ensure users consistently see the same variant across sessions. Select one or more properties (e.g., userId) to create a hash key for consistent bucketing.
Validation
Save Validation
- At least one component must be selected.
- All A/B testing percentages within segments must total 100%.
Publish Validation
- At least one component must be selected.
- At least one segment must be defined.
- All segments must have variants selected for all components.
- All A/B splits must have variants assigned.
- All components must have fallback variants selected.
- The experience must be saved with no unsaved changes.
Tips
- Add organization properties in the left panel before configuring segments — these become available as rule options.
- Use A/B testing to validate changes before rolling them out to all users.
- Always set fallback variants to ensure all users see a component, even if they don't match any segment.
- Use sticky hashing with a stable property like userId to keep the user experience consistent across sessions.
- Tag your experiences consistently to make them easy to find across teams.